

Good day, everyone! I hope you are well.
I'm assuming you have a basic understanding of state management, useState, reducer(), and react terminologies.
Let's understand first, Why we need State management ?
- It helps data actually to flow from your app to state and vice versa.
- It helps you to know exactly where your data is (snapshot of the entire data).
- It makes development faster.
Let's have a look at useContext() and useReducer() one by one.
1. useContext()
What is Context?
Context provides data to components no matter how deep they are in the components tree. It is designed to share data that can be considered “global” for a tree of React components, such as the current authenticated user, theme, or preferred language.
Why context?
The main reason for using useContext is to avoid Prop Drilling.
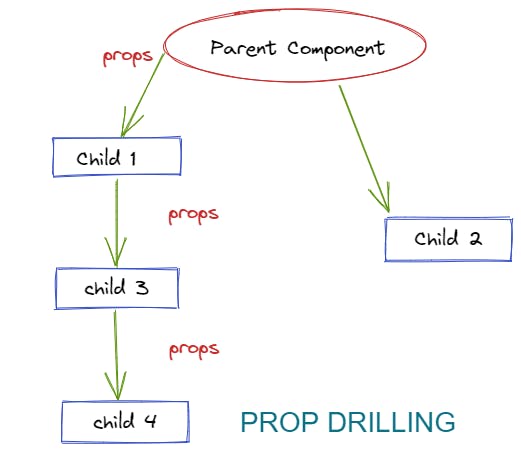
What is Prop Drilling?
We know that every react app includes different components that communicate with one another to make the app work.
So, in order to share data with one another, we'll need a technique, right? Prop Drilling is an old-school way of sending props from a higher-level component to a lower-level component.
So, even if the child is at the lowest level of the tree, then the prop needs to travel to each intermediate level. This becomes an issue in itself because of its repetitive code and the prop needs to send to every level even if it is not used and needed.
Therefore, to solve this: useContext() comes into rescue.
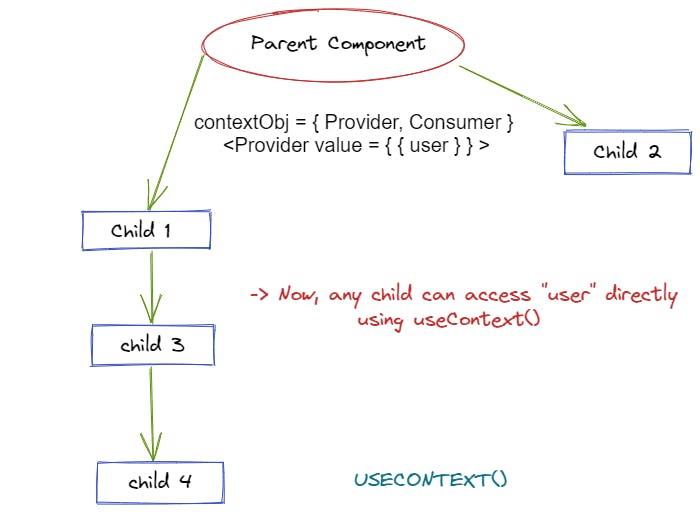
How useContext() solve the Prop Drilling problem?
- It creates a global context for a Tree of React components.
- It is designed to share data without sending data to every level.
useContext() is a majorly works in 3 simple steps:
- Create Context
- Create a Provider
- Consume the Context
Initially, you need to create a context at the parent component level. Once it is created, some provider needs to be there which provides the context. And, at last the context can be consumed by any component that subscribes to that context through useContext().
Let's understand this with code step by step: But, before that let's import the required APIs for useContext() -
import { createContext, useContext } from "react";
1. Create Context:
A context object is created using the createContext() API and its composed by two elements:
(i) Provider : It provides the value. (ii) Consumer : It consumes the value.
const DemoContext = createContext( { theme: "dark" } );
Default Value: If no value is provided, default_value is been used. This is helpful for testing components in isolation without wrapping them.
2. Create a Provider:
- Provider allows us to consume components.
- It accepts a value prop that is consumed by child components.
- One Provider can be connected to many consumers.
- All consumers(descendants of a Provider) will re-render whenever -> Value props changes.
- The component which is wrapped inside the Provider is treated as it's children.
Let's see how we can create a Provider:
const ThemeProvider = ({ children }) => {
  const [theme, setTheme] = useState("light");

  return (
    <ThemeContext.Provider value={{ theme, setTheme }}>
      {children}
    </ThemeContext.Provider>
  );
};
Now, if you want to apply a dark theme to your complete app, then you need to wrap the App() component inside the Context Provider as:
import App from "./App";
import { ThemeContext } from "./demo-context";

const rootElement = document.getElementById("root");
ReactDOM.render(
  <StrictMode>
    <ThemeContext.Provider>
        <App />                     // Providing context to App root
    </ThemeContext.Provider>
  </StrictMode>,
  rootElement
);
3. Consume the Context:
Now, that we have context ready, we can consume it in any component. Consuming the component simply means subscribing to the context to use the values provided by it.
const { theme, setTheme } = useContext(ThemeContext); // any_provider_value can be a string, number, object or a function too
Note:
Now, we don't need to pass data from parent to any child component. Whoever wants to use that data, it can consume the context and use the data.
Context can be created anywhere (in any JS file). However, we create a new file for it and describe all context-related things in it to keep it neat.
here is the code sandbox link where you can find the working of use-context.
2. useReducer()
In some ways, it's similar to useState(), but it's used when there are more than two states to handle. However, most beginners get confused about how useReducer works internally.
Let's clarify this confusion and see how the flow and wiring work.

Initially, the useReducer() is defined as :
import { useReducer } from "react";

const [state, dispatch] = useReducer( reducer, {counter: 0} );
Here, useReducer() takes two arguments, first a reducer function and the second is initialState.
The useReducer() returns an array of two elements i.e. state and dispatch function which works as a setter function(sets the value of state) and can be passed around to other components through props.
Now, let's define the reducer():
const reducer = (state, action) => {
  switch (action.type) {
    case "increment":
      return { ...state, counter: state.counter + action.payload };
    case "decrement":
      return { ...state, counter: state.counter - action.payload };
    default:
      return state;
  }
};
Here, reducer() takes two arguments, (i) state and (ii) action . The initial state is set to the state of the reducer initially.
Also, action has two parts: (i) type (must) and (ii) payload (optional). The payload value is set to state variables based on the type.
Now, let's call and use this dispatch() with ex:
<button onClick={() => dispatch({ type: "increment", payload: 42 })}> + </button>
<button onClick={() => dispatch({ type: "decrement", payload: 10 })}> - </button>
Whenever dispatch() is called, it will invoke the reducer() and set the type and payload for the action. Then, with the help of a switch case, based on the "type", the respective operation will be done with payload value.
In our example, if the type is "increment", then 42 is added to the counter and if the type is "decrement" then the 10 is subtracted from the counter.
here is the code sandbox link where you can find the working of use-reducer.
Conclusion ✏
- Use useContext() where you need to provide data to many components (theme, authenticated user, and preferred language) without being passed to each level.
- useContext() overcomes the problem of prop drilling.
- Whenever there are more than two states to manage, always use useReducer().
- It's a good practice to pass an object as an initial value for the reducer() because we can add more properties and values in the future.
If you've made it this far, I'm quite sure you're confident in these two hooks. Let me know what you liked best about the blog in the comments section. Happy learning, See you in the next blog! 😊